Tuesday, November 9, 2010

Put on your fancy pants for this one!


You'd think I'd just be looking for any excuse to use a Chuck Norris picture in my blog, wouldn't you? I can admit it was just luck that a Google image search for "pants" led me to it, but isn't it great? Ass-kicking, even? I thought so...

I know it's been a while. Just after having my gallbladder removed, and then my hospitalization immediately following, I had the privilege (read: TORTURE!!!) of developing a cyst on my tailbone, which became horribly infected. Long story short, I was out of work and school for a month total, receiving home health care for the majority of it. Despite unsympathetic professors trying to keep me down, I'm starting to come back out of things and feel like a human being again. Well, as human as I ever was, anyway.


To celebrate my survival, here's a new recipe: Tilapia Amandine. It's adapted from a recipe on the Whole Foods website for Catfish Amandine. The dish consists of tilapia dredged in seasoned flour and pan-fried until crisp and golden brown. The tilapia is then topped with a savory, lemony pan sauce and toasted slivered almonds. This dish is perfect for a quick weeknight dinner or to impress unexpected company without much effort. Another bonus is the short ingredient list (half of them are seasonings) consisting mostly of pantry staples. Served with a simple side salad, sauteed green beans, and oven roasted potatoes, you've got dinner in a snap, and once you taste this one, I guarantee you will add it to your repertoire.

Tilapia Amandine

Ingredients:

4 tilapia fillets (defrosted frozen is fine)
1/2 cup all purpose flour
1 teaspoon seasoning salt
1 teaspoon black pepper
1 teaspoon onion powder
1 teaspoon garlic powder
1/2 teaspoon paprika
1/3 cup slivered almonds
3 tablespoons olive oil + more for the pan
3 tablespoons butter
3 tablespoons Worcestershire sauce
2 tablespoons lemon juice
1 tablespoon parsley
pinch salt
pinch pepper

Tools:

plate, pie pan, shallow container for dredging
10-in sautee pan
plate lines with paper towels

Instructions:

1. Fill your sautee pan with about 1/4" olive oil and heat on a medium setting.

2. Toss the flour and spices in your dredging pan or plate until thoroughly combined. Dredge the first two fillets in the mixture, tapping off any excess and once the oil is hot enough, pan fry the fillets for four minutes on each side, or until golden brown and crispy on each side. Repeat for the last two fillets, transferring each fillet to the paper towel-lined plate to drain when finished cooking.

3. Rinse and dry your pan and return it to the burner. Turn the heat to low and add the butter and olive oil. Once the butter has melted, add the almonds cook them until they are golden brown, 3-5 minutes.

4. Once the almonds are toasted, add the lemon juice, Worcestershire sauce, parsley, salt, and pepper to the pan, Mix and simmer for about 1 minute to allow the sauce to thicken slightly.

5. Plate your tilapia and pour the sauce over them. Enjoy!

Serves 2-4

Sunday, August 8, 2010

If you can't beat 'em, make your own damn rules!


Back so soon! Aren't you impressed?!

Since I've been sick, my diet has changed significantly as I've been unable to eat the way I used to. In particular, I've noticed that sweet and sugary items make me feel ill, especially when they're... not the most natural ways to get your sugar fix (Hello, ice cream and Betty Crocker. I'm looking at you...). Instead, I've been searching for healthier ways to satisfy my sweet tooth while not overdoing it on my poor tummy. Things like sugar-free pudding and fat-free yogurt are great for a creamy fix, but sometimes a girl wants a baked good!

Today, I noticed three super ripe bananas sitting on my counter, and I decided I'd better use them up quick before they go bad. Baked goods and ripe bananas go together like bees and honey, but I was looking for more than basic banana bread. That's when I stumbled upon a recipe for Banana-Cocoa Muffins on the Kelloggs website.

By using healthy Special K cereal, naturally sweet bananas, and the addition of peanut butter chips, these muffins are moist and perfectly delectable without being overwhelming. As always, I've adapted the recipe, but feel free to check out the original.

Cocoa-Banana and Peanut Butter Muffins

Ingredients:

3 mashed bananas
1 1/2 cups Kellogg's® Special K® Original cereal
1 cup fat-free milk
2 egg whites
2 tablespoons vegetable oil
1/2 cup brown sugar
2 teaspoons baking powder
1/4 teaspoon baking soda
1 teaspoon vanilla
1/4 teaspoon salt
1/4 cup unsweetened cocoa powder
1 cup all-purpose flour
3/4 cup peanut butter baking chips

Tools:

12-cup muffin pan
mixing bowl
mixing spoon
measuring cups
measuring spoons
optional: muffin liners

Instructions:

1. Mash bananas in a mixing bowl. Add milk and cereal, mix together, and let sit for two minutes to allow the milk to moisten the cereal.


2. Add egg whites, oil, brown sugar, baking powder, baking soda, vanilla, and salt. Mix thoroughly.


3. Add cocoa powder and mix until combined.


4. Add the peanut butter chips and flour, mixing well.

5. Spray muffin pan with cooking spray or line with paper liners. Fill to the brim with muffin mix.


6. Bake at 400˚F for 20 minutes, or until a toothpick inserted in the center of the muffins comes out clean.

Tuesday, August 3, 2010

Que sera sera...


Long time, no see blog followers. Since you last heard from me, my life has taken some new turns. The health issues I mentioned in May have taken a backseat in order for me to concentrate on getting myself through new! improved! fun-filled! health problems that have developed since then.

Earlier this month, I was hospitalized after days of vomiting and a pain-filled evening and was diagnosed with gastritis. This hospitalization was the culmination of months and months of vomiting, loss of appetite, no energy, queasiness, and all-around feelings of shitty-ness on a near-daily basis. Over these months, I've lost 30lbs through absolutely no effort on my part, really. After leaving the hospital, being put on an alarming number of prescriptions, and still spending my days feeling like poo, I've been referred to a surgeon for gallbladder surgery.

I'm exhausted. I leave you with my only thoughts, for now, and one of the recipes that has been getting me through the last few months.


Roasted Tomato-Basil Soup

Ingredients:

5 medium tomatoes
1 large onion
4 garlic cloves
olive oil
1-32oz. carton reduced sodium, reduced fat chicken broth
1 teaspoon seasoning salt+additional for seasoning
1/2 teaspoon black pepper+additional for seasoning
1 tablespoon onion powder
1 teaspoon garlic powder
1/4 teaspoon paprika
2 dried bay leaves
1 tablespoon dried basil
1/4 cup reduced-fat Parmesan cheese
1/2 cup fat-free sour cream

Tools:

aluminum foil
baking pan
soup pot
immersion blender/regular blender

Instructions:

1. Preheat your oven to 375˚F. Cover your baking pan with aluminum foil and lightly drizzle the bottom with olive oil.

2. Cut your onion into sixths and lay them on their sides on the baking sheet.

3. Cut your tomatoes into thirds by cutting around the core in three slices. Then squeeze the chunks until the seeds are removed. Place them face up on the baking sheet with the onions.

4. Drizzle the onion and tomato chunks with olive oil and sprinkle with a generous amount of salt and pepper.


5. Place your garlic cloves in a small square of aluminum foil, drizzle with a teaspoon of olive oil, and fold the foil into a little bundle.


6. Roast the veggies for 45-50 minutes.

7. Transfer the roasted veggies into your soup pot and add the entire carton of chicken broth. Blend with an immersion blender until smooth. If you do not have an immersion blender, simply blend the ingredients in a blender until smooth and transfer to your soup pot.


8. Add all of the seasonings except the basil and simmer over medium-low heat for 30 minutes.


9. Remove the bay leaves and add the cheese and sour cream. Stir until smooth.

10. Serve with your choice of accompaniments. I like to top mine with Cheez-its. My fiance prefers good ol' grilled cheeses.

Saturday, May 1, 2010

I'm Back in the Saddle Again...

For those of you thinking of horses, shame on you! When I came up with that title, Steven Tyler's electric, screaming melodies were floating through my brain.

I'm baaaaaack!!! I'm back in the saddle agaaaaaain!!!! I'm baaaaaaaaack!!!!!

Not much about my situation has changed since the last time I posted, but I hope I'm right in saying that my disposition is slightly more positive than it was before? And yes, that is a question because I'm really not sure of the answer. I still have no idea what lies ahead for me, and if you want the truth about it, I'm terrified. Although I admittedly spent nearly a week in bed, slumming, bumming, crying, and watching all of the cooking shows and bad television I could stand, I eventually emerged and got back to reality, perhaps with a little less vigor than before. But it has caused me to hold fast to the things that I do have and to appreciate that they're all I have, and I should take good care of them. (For those of you wondering where I've been or what the hell I'm talking about, see my previous blog, "When life hands you lemons, make lemon bars?"

During my time bumming and slumming, I spent a lot of time watching Food Network. One evening, I watched an hour of Best Thing I Ever Ate, including an episode on barbecue. A lot of the places chosen by Food Network celebrities were in Memphis, where my boyfriend and I recently spent three very fun and food-filled days during my Spring Break. Sadly, we didn't eat at any of the places discussed on the show, but we did eat at one place that was quite memorable for us--Pig on Beale Street.

I visited Pig once before, during the Hurricane Gustav evacuation, when I tried the most delicious pulled pork nachos. Round corn tortilla chips were topped with sinful amounts of goopy nacho cheese, followed by mounds of soft, tender pieces of pulled pork. The whole thing was garnished with a sprinkle of rub spices and spicy slices of jalopenos. For an extra punch of flavor, you can top it with the sweet or spicy barbecue sauces on the table in picnic-style squeeze bottles. When I went back in April, I knew I needed to have those nachos again. But it wasn't enough, and as I watched limitless amounts of Memphis barbecue flash on my screen on The Best Thing I Ever Ate, my mind drifted to those heavenly nachos and how I could get some back into my life. The only way, that I could see, was to take matters into my own hands.

Let me take a moment to explain that the only meat that typically enters my apartment is a cutlet, a tender, a chop, or ground. I don't cook big cuts of meat, and I honestly have never enjoyed them very much. But I knew this craving had to be satisfied, and there was only one way to satisfy it. After a little research on the internet to find the perfect cut, temperature, and time, two trips to the store, and plenty of time spent trying to pick one that was just right, I invited a pork shoulder butt into my home.

And now I bring it into yours, thanks to a friend's suggestion that I post The Great Pig Experiment on my blog. With special thanks to her, I am now back in the saddle after my own personal D-day.

When looking for the perfect specimen, go for a cut that is about six to eight pounds (if it costs you more than $10, you're doin' it wrong!) and has PLENTY of marbling! Dieters, plug your ears. The fat in the pork shoulder is what will give your pulled pork its tenderness, and it's also one of the things that will keep it from drying out during its loooooooooong cook time. You also want a cut with a nice, thick slab of fat on one of its sides. When you cook your meat, you'll place it fat side up. That way, the fat will slowly melt and drip all through your meat, once again keeping it from drying out on you. And trust me, there's nothing worse than stringy, dry, nasty pork that gets caught up in your teeth and takes a half hour to chew.

This is also a dish that is not a quick, mid-week dinner (although its leftovers will be!!!). Pulled pork needs to be done right or not at all. Doing it right means cooking it low and slow. All. Day. Long. Also, you're also going to start the entire process the night before, allowing your meat to marinate in the spices you'll put on it. Cooking it on a weekend night will allow for a perfect family dinner, and there are plenty of options to play with when it comes to the leftovers. It may seem like a big undertaking, but I promise you, it's not. And it's all worth it in the end.

One more note: A meat thermometer is going to be your best friend during this process. 10 hours seems like a long time, and it is. However, your meat thermometer will be your assurance that this lovely hunk of pig will not come out looking and tasting like a tough piece of leather.

Timid cooks, don't despair! I managed to do this with no recipe, no prior experience, and no clue! Trust me when I say that if I can pull this off, you can too! With the success of my first Great Pig Experiment, I hope to guide you through your own so that yours will bring you as much delight as mine did. Good luck!


Pulled Pork Shoulder

Ingredients

Six to eight pound bone-in pork shoulder butt (The higher up on the shoulder your meat comes from, the better. Skip anything that says "picnic." "Pork Shoulder Butt" is what you want.)
1/4 cup apple cider vinegar
1 1/2 tablespoons Worcestershire sauce
1/4 cup apple juice
seasoning salt (like Lawry's)
pepper
paprika
chili powder
onion powder
garlic powder
cumin

Tools

roasting pan (13x9)
aluminum foil
meat thermometer
pastry brush

Instructions

1. In a small bowl, mix together the Worcestershire sauce and the vinegar.

2. Spread a sheet of aluminum foil on your work surface and place your meat, fat side down, on the foil. Liberally sprinkle the seasoning salt on all sides but the fat side, making sure you rub the salt into the meat. Next, brush your vinegar mixture onto the meat. Now, apply the rest of your seasonings liberally in the same way you applied the salt, rubbing each spice into the meat in the following order: pepper, garlic powder, paprika, chili powder, and onion powder. Apply the cumin last, as you will want to use it very, very lightly. Once you have applied all of the spices, apply one final coating of the vinegar mixture.**

3. Fold the foil around the meat tightly and allow it to marinate in the refrigerator overnight.

4. The following morning, preheat your oven to 200˚F. Line your roasting pan with aluminum foil, and pour the apple juice into the bottom of the pan. Place your roast in the pan, fat side up, and cook in the oven uncovered for 7 hours, or until your meat reaches 160˚F when testing the thickest part of the meat with your meat thermometer.

5. Once your meat reaches 160˚F, turn your oven up to 225˚F and resume cooking for 2-3 more hours, or until your meat reaches 180˚F. At this point, take your meat out of the oven, cover it with aluminum foil, and allow it to rest for 20 minutes. In this time, it will continue to cook from the residual heat another 5-10˚F.


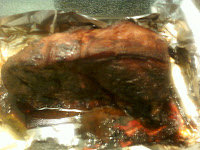
6. To cut, trim the fat slab off the top of your meat, and cut the meat from the bone. It shouldn't give much resistance. Then, get chopping! Using a sharp knife and a fork, just work your way through the meat until it is in smaller, more manageable pieces. Now that the meat has had a chance to cool off a bit, get in there with your hands and break down the pieces even further. If it's not messy, you're not doing it right!


**Note that I haven't given measurements for the seasonings. The size of your pork shoulder will dictate how much you use, with the exception of the cumin, which should be sparsely applied. When you're finished seasoning your meat, it should have a reddish color from the paprika and chili powder.


Now you have pulled pork... what to do with it?

Here's some idea for what you can do with your own Great Pig Experiment.

Pulled Pork Nachos

Ingredients

Pulled pork
corn tortilla chips (lately I've been favoring the On the Border brand, but choose your favorite)
jarred yellow cheese dip (I used Pace's Mexican 4-Cheese Salsa con Queso for its mild flavor that compliments rather than overpowering the accompanying flavors
barbecue sauce (I used Bull-Eye Kansas City style. It's nice and sweet, which I like)
1 can jalopeno slices
seasoning salt
paprika
chili powder

Instructions

1. Spread the chips on a microwave-safe plate.

2. Grab a handful (about 1/2 cup) of the pulled pork and place it in a bowl. Drizzle two tablespoons of the barbecue sauce and stir until well mixed.

3. Drizzle your chips with a liberal coating of cheese. A trick for easy, non-globby application: Place three spoonfuls of the cheese into a small ziploc baggie, seal, and cut the tip off of one of the bottom corners. Squeeze the cheese out onto the chips as though you were applying icing to a cake using a pastry bag. Toss the empty, used baggie! No muss, no fuss!

4. Sprinkle the pulled pork over the top of the cheese and chips. Sprinkle with the seasoning salt, paprika, and chili powder to garnish.

5. Microwave for one minute, or until heated and the cheese gets melty.

6. Top with jalopenos if desired. Serve with extra barbecue sauce either on the side or, if you have a squeeze bottle, drizzled over the top of the nachos.


Pulled Pork Sandwiches

Ingredients

Rolls or buns (barbecue purists will assert that there is no other way but on a white, soft hamburger bun, but I used a kaiser roll from the deli section)
pulled pork
barbecue sauce

Instructions

1. Mix together one cup of pulled pork and 1/4 cup barbecue sauce for each sandwich.

2. Spoon the mixture onto the bottom bun.

3. On the top bun, apply two tablespoons barbecue sauce.

4. Enjoy!


To serve with your sandwiches, how about some potato salad!

Classic Potato Salad

Ingredients

4 medium potatoes, peeled and diced
1/4 cup sandwich cubes relish
1/2 cup mayo (I like Hellman's)
3 tablespoons yellow mustard
1 tablespoon seasoning salt plus 1 tablespoon
1 teaspoon pepper
1 teaspoon onion powder
1/2 teaspoon garlic powder

Instructions

1. Boil the potatoes and 1 tablespoon seasoning salt until fork tender, but still firm enough that they don't fall apart when pierced with the fork. Drain and set aside.

2. In a bowl, combine the drained potatoes and the remainder of the ingredients. Use my measurements for the mayo and mustard as a guide. Some people like their potato salad more mustardy, so use your own palate as your guide. My measurements should give a pretty balanced taste.

3. Refrigerate for one hour before serving.


Pulled Pork Pizza

Ingredients

pizza dough (make your own, use the Pillsbury stuff, use the pre-made, bread-like crusts like Boboli... just make sure to cut back on your cooking time if you use something pre-made)
1 1/2 cups pulled pork
1/2 cup barbecue sauce plus 1/2 cup
8 ounces smoked Gouda cheese, shredded
8 ounces mozzarella, shredded

Instructions

1. Preheat your oven as directed by the instructions on your crust.

2. Spread the barbecue sauce over the crust. Mix together the pulled pork and 1/2 cup barbecue sauce in a bowl.

3. Top the crust with the mozzarella cheese. Sprinkle the pulled pork over the mozzarella, then top with the Gouda cheese.

4. Bake according to your crust's instructions. Slice and enjoy!

Optional additions to your pizza: Red onions, bell peppers, jalopenos

Pics of pizza will be up tomorrow!

Thursday, April 22, 2010

When life gives you lemons, make lemon bars?


I suppose we've all heard the saying, "When life gives you lemons, make lemonade."

Well, readers, life sure has given me an orchard full of lemon trees. I know that, despite making promises to some of you regarding upcoming recipes, I've been noticeably absent from my beloved blog lately, although I did find a bit of time for some shameless (or shameful... you decide) self-promotion in the form of a Facebook page. If you haven't already, feel free to become a fan. Or "like" me, as Facebook has now decreed. It's where I will eventually be making announcements and taking suggestions.

In the meantime, back to these lemons. My first bushel of lemons came to me as the result of the numerous doctors appointments I've had in the past few months. Since I was thirteen years old, I have suffered from PCOS. After one surgery when I was fifteen and several years of medication, things were always kept in check. Recently, however, I became unchecked. The pain I experienced throughout my adolescence has now invaded my every day life. Just as doctors had little explanation all those years ago, they are even more clueless now. However, the doctor who has been overseeing my care has offered several suggestions, which has led my boyfriend and I to our current decision. When I go back to my next appointment, I will undergo a type of drug therapy that essentially mimics menopause. That's right--at twenty-four years old, I will become a woman in her fifties or sixties. For several months, my health will be monitored, particularly my pain, and if we determine that it has improved during the course of this therapy, I will then have a hysterectomy. If the drug therapy does not work, then I will come off of it with no repercussions except being just as lost as I was before, if not more so.

For the past week, I've been keeping these lemons under wraps, saving them for a special occasion. Meanwhile, I've actually been a bit overwhelmed by the future and what I'll have to face very soon. There is no way of telling how I'll react to the drugs I'll be given, and that fear of the unknown has been quite intimidating. To go along with that, of course, has been the looming thoughts of possibly 100%, without a doubt, absolutely losing my ability to have children, and exactly what that means to me, as well as one person in particular who means so much to me. One of the few things that got me up and at 'em after nearly a week of bumming and slumming at home was the hope that there would be some news on a position I applied for within my department.

Ever since I laid out my plans to enter the master's program, I knew that I was working toward this one position: an opportunity to work side-by-side with a faculty member in the department, which would eventually culminate with the chance to teach a class solo. Everything about the position was everything I wanted. Even more, I felt like the position was made for me. After substituting several classes over the semester for various faculty members, I felt like this opportunity was exactly what I needed and everything I could dream of. After I learned which faculty member would possibly be a part of the program, I was even more enthusiastic, as I knew it was someone I had a lot of common interests with, and I thought it was with whom I could work well and go far. This convinced me even more that this position was custom made just for me. It was perfect.

I, however, am not perfect, and perhaps that was my downfall. I received my rejection e-mail this afternoon. After some "positive" fluff and attempts to encourage me to apply next time, next Spring, I was handed another bushel of lemons. Next Spring, I will be at the end of my studies in the master's program, and it will be too late. But thanks anyway, I suppose.

Right now, I have no idea where my life is going, or even what I want. However, as I lie here in bed with no sign of sleep in my near (or even distant) future, I've realized that I have got a shit ton of lemons, and not a damn thing to do with them. So rather than sit here and think (or cry) anymore, I present to you, loyal readers, lemon bars. Because why make lemonade when you can make lemon bars?

In the meantime, I'm not sure when my next post will be, as it seems I've got a lot to contend with right now. But I promise not to stay gone too long, and as soon as I'm back in the kitchen again, you all will be the first to know.

Creamy Lemon Bars

Ingredients
20 shortbread cookies (I used almond Chinese cookies)
1/2 cup flour
1/4 cup brown sugar
1/4 cup butter
8 ounces cream cheese, softened
1 cup sugar
2 eggs
2 tablespoons flour
3 tablespoons lemon zest
1/4 cup lemon juice
1/4 teaspoon baking powder
powdered sugar, for garnish

Tools
Food processor (or my trusty Ninja)
9x9 baking dish
zester
aluminum foil (not pictured)


Instructions

1. Preheat the oven to 350 degrees.

2. Pulse the cookies in the food processor until they are thoroughly crumbled. Add the brown sugar, 1/2 cup flour, and butter, and pulse until the crumbs begin to stick together.

3. Line a 9x9 baking dish with aluminum foil, and press the crumb mixture to the bottom and about a 1/2 inch up the sides. Bake it for 15 minutes in a 350 degree oven.


4. In a clean food processor, cream together the sugar, cream cheese, and eggs until smooth. Add the flour, lemon juice, lemon zest, and baking powder and pulse until smooth.

5. Pour the mixture into the crust, smooth it over, and bake at 350 degrees for 25 to 30 minutes, or until the center is set.


6. Refrigerate for two hours and sprinkle with powdered sugar before serving. For easy cutting, pull the uncut bars out of the baking dish using the aluminum foil lining. Transfer to a cutting board and cut into individual bars.


Original recipe courtesy of Kraft.

Monday, March 29, 2010

A tale of epic falls and chocolate cakes...

Let me begin with this: I had big plans for this weekend.

A friend and contributor to the creative writing publication I edit was having her award-winning play produced in New Orleans this weekend, so myself and a friend were going to drive down to see it. The city was alive with the jitterings of what we could only guess were Spring Break-ers, as we couldn't imagine the Tennessee Williams Festival drawing quite so many people. Because of all the hubbub, we were forced to park a little farther away than either of us anticipated, so by the time we got to the theater, I was feeling fairly parched.

Because I didn't drive, I ordered myself a Malibu and orange juice, and my friend and I made our way to the front row of the theater, where my playwriting buddy was sitting with her family. On the way to the front, I managed to overlook the stage stairs that were directly in my path. My shin, however, did not. As I collided into the stairs, my drink went flying, ice sprang forth from my cup like confetti, and I only just managed to catch myself. And all of this happened as I realized that my boss was in attendance, as well.

*Facepalm*

I. Was. Humiliated. With all of my embarrassment, I hardly noticed the throbbing of my foot and shin until well into the show. I made it through the rest of the night purely on the endorphins of my embarrassment, and when I got home I went straight to bed.

As I said, I had big plans this weekend, among them being my boyfriend's 32nd birthday the following day. For months I knew exactly what I would do on his special day. Let's rewind to December 31, 2008. For New Year's Eve, I planned a picnic on the waterfront that included steaks, loaded mashed potatoes, chicken and sausage gumbo, and an apple and cranberry tart with whipped cream. For his birthday, I was going to recreate the evening that my boyfriend first told me he loved me, so I planned a lakefront mini-birthday party for two.

But my leg. Augh, my leg. Still, I was determined to cook a meal of filet mignon, garlic whipped Yukon potatoes, garlic green beans, chicken and sausage gumbo, and German chocolate birthday cake. I woke up at 8:30, went to the store, and spent the day cooking, despite some significant snafus. And when the time came, we had a lovely, if windy, lakefront picnic, complete with presents.

After getting over the adrenaline from my embarrassment, I replaced it with the adrenaline of trying to pull off this perfect day. By nightfall, I was exhausted and in a lot of pain. At this point I had also noticed several swollen lumps on my ankle, shin, and foot.

Today, my boyfriend took me to the urgent care, where after 2 hours of waiting and about ten x-rays, we found out from the doctor that I appeared to have a hairline fracture on my fibula, running parallel to the bone. In order to be sure, the doctor planned on sending it off to a radiologist, but in the meantime, I would be subjected to a giant black boot (and no, not a fabulous and stylish pair of new kicks) and a set of crutches that make my bedroom smell like a hospital.

I've just received the phone call from the doctor that my injury is not, as they suspected, a fracture, but I will be booted and crutched for a week to ensure I don't further damage myself with epic levels of clumsiness. At least the boot will protect me from 15-lb kitties walking over my leg in the middle of the night, right? Still, that doesn't quite make up for the other cat, who rubbed his teeth on the bumpy, skid-free bottom of my boot for five agonizing minutes today. *Shivers*

What this epic tale of falls and chocolate cakes is meant to tell you is that it may be a little while before I'm able to start blogging as much as I would like to. I've had a lot of ideas for foods I would like to try my hand--and whisk-- at. Alas, it will have to wait.

Now, an update on the CAKE VS. PIE BATTLE ROYALE!!!!!

I've been thinking a lot about the line up and the terms of the proposed Cake vs. Pie battle royale (with cheese). However, looking over some of the brackets made me realize that some of these head-to-heads are just ridiculous. Birthday cake vs. fruitcake? Pshhht, please! So I've revised the line up, and here's where it stands.

Pies:

Apple
Pumpkin
Coconut Cream
Banana Cream
French Silk
Lemon Meringue
Key Lime
Pecan
Peanut Butter
Wildcard--Buttermilk Pie

Cakes:

Carrot
Red Velvet
German Chocolate
Devil's Food
Pineapple Upside-Down
Boston Cream Pie (Oh yeah, I'm shaking things up! Look at a BCP and tell me that's not a cake.)
Coconut cake
Chocolate Flourless Cake
Molten Chocolate Cake
Wildcard--Tres Leche Cake


To bring my fall story around full circle, I was planning on making the coconut cake to go up against the German chocolate cake for the first bracket on the Cake side of the battle, but with my injury, I just can't get to the kitchen to make the coconut cake. Thus, I'll be putting the battle on hold for a little while. When I get back to it, I will be offering samples at work once a week, so many of you will have a chance to put in your vote.

In the meantime, here is the recipe for the Chicken and Sausage Gumbo I made this weekend. Let me preface this recipe by saying that there is no wrong way to make a gumbo! This is a quick and fairly simple recipe based on the one handed down to me by my father, who was born and raised in da' bayou.

Chicken and Sausage Gumbo

Ingredients

1/4 cup flour
1/4 cup vegetable oil
1/2 cup (total) of onion, bell pepper, and celery, diced**
1 tablespoon garlic, minced
1 32-ounce box of low sodium chicken broth
1/2 cup water (not pictured)
1 bay leaf
1/2 teaspoon (or to taste) of the following seasonings:
salt
pepper
garlic powder
onion powder
Old Bay seasoning
cayenne pepper
Dash of hot sauce, to taste
1 chicken breast or two chicken tenders, diced
Two sausage links, sliced (my brand of choice is Conecuh smoked sausage)

Instructions

1. Heat the vegetable oil over medium heat in a small sautee pan until it starts to ripple. Carefully add the flour and begin to stir. Cook over medium to medium low heat until the roux turns the color of a chocolate-peanut butter mixture. YOU MUST STIR CONSTANTLY THROUGHOUT THIS ENTIRE PROCESS!!!

2. Meanwhile, in a 3-quart saucepan sautee the onions, celery, bell pepper, and garlic over medium heat until translucent. Once the roux is ready, pour it onto the sauteed vegetables and mix until they are coated.

3. Add the chicken broth to the pot along with the water, add the bay leaf, and allow the mixture to come to a simmer.

4. Once the mixture has come to a simmer, add your seasonings. Seasoning your gumbo is a matter of taste. The measurements I've provided are simply a start to your gumbo, so please feel free to add as much as you like. There are no limitations. Next, add the diced chicken and sliced sausage and allow the mixture to simmer for at least 15 minutes.


5. Finish the gumbo with a dash of hot sauce, to taste, and serve it over rice. Enjoy!!


**At some supermarkets, you can find pre-diced mixtures of these three ingredients in the produce section. If you can find it, go for it! Mine was $3, and with the current cost of bell peppers, it was well worth it!

Sunday, March 21, 2010

I need your imput, please!!!


I recently ran across a website, Jezebel.com, that has forsaken the March Madness basketball brackets for their own epic Cake vs. Pie battle royale (with cheese).

It got me thinking whether it would be interesting to you all if I did my own little experiment in dessert superiority. I would really appreciate some input on whether this is something everybody would enjoy following. I also think it could be argued that some of the contenders can be eliminated (I mean, birthday cake vs. fruitcake. Really?), which would expedite the process slightly.

Let me know!!!

Tossing cookies, up-chucking, regurgitation... I don't care what you call it. Puking is a euphemism for "I wish I were dead..."

Bleeeeeeehhhhhhhhuuuuuuuuugggggggggghhhhhhhhhhhhhhhhh...

Yesterday, I had a lovely meal with my boyfriend at The Crazy Pig in Hammond, Louisiana. I enjoyed every bite of my shrimp po'boy with fries and fried mushrooms with ranch. Let me digress for one moment and explain to you all one thing. I. LOVE. RANCH. I could marry ranch, I love it so much. Ranch and I would live happily ever after, because really, who divorces ranch? I could stick a straw in it and drink it on the spot. I never have, let me be clear. I'm just sayin'...

Anyway, I was fine for the rest of the day, and I even had a small snack of Funyuns after a light nap. However, as the night wore on, so did the inner lining of my stomach. Needless to say, I was up until five in the morning "wishing I were dead."

Because I was up so late, I slept until noon today, at which time the boyfriend was already at work. When I called to apologize for keeping him up half the night with my pukey-ness (when he had to be up early for work, no less), he told me he was on his way back home because he had already tossed some cookies of his own. Great... now I've contaminated him.

After he got home, I considered some lunchtime possibilities that would sit well on both of our stomachs. The only soup I happened to have on hand was some broccoli cheese in a can. From what you all have learned about me thus far, you should know better of me than to think that I could ever just open a can, heat it up, and serve it. Oh, no. I've got to add my own twist to it. If I can't make it from scratch then, by Jeebus, I'm at least going to make it my own.

That being said, I bring you this edition of Amateur Noms, Broccoli-Baked Potato Soup. This recipe takes a mere 20 minutes from start to finish, and you will never know that the finished product came from a can. The end result is comforting and delicious. Just the ticket for the road to recovery--or just a quick weeknight meal.

P.S.--Sorry there's only one picture this time. I'm sick and lazy. We'll return to our regularly scheduled programming soon.

This recipe is dedicated to a reader who sent me a recipe of her own this week. It made my day and I can't wait to try it! Thank you so much!


Jazzed Up Canned Soup: Broccoli-Baked Potato

Ingredients

3 strips bacon, chopped
1 yukon gold potato, diced
1 can broccoli cheese soup (I used Campbells)
1 can's worth of milk (about 10 ounces, as per soup instructions)
2 ounces cream cheese
1/4 cup EACH sharp cheddar, smoked Gouda, and colby jack mix, shredded or diced
Optional: 2 tablespoons cheddar for garnish, crackers

Tools

1 2-quart saucepan, or larger
Soup ladle
Slotted spoon
Knife
Paper towel-lined bowl or plate

Instructions

1. Over medium heat, cook the bacon in the saucepan until very crunchy. The goal is to "overcook" the bacon so it doesn't become chewy when added back into the soup later.

2. With a slotted spoon, pull the cooked bacon from the saucepan and allow it to drain on a paper towel-lined plate or bowl. Use the bacon fat to saute the potato until the outside is toasty brown and firm**. Once again, by ensuring the outside is crunchy, you are also ensuring the potato bits will retain their shape and won't dissolve into the soup.

3. Pour the soup into the saucepan, followed by the milk, and stir until combined. Lower the heat to medium-low.

4. Return the bacon to the saucepan. Then add the cheeses. Cook over medium low heat for 10 minutes.

5. To serve, ladle into soup bowls, top with extra cheese as a garnish, and serve with crackers. My favorite way to eat it is to pour some Cheez-its into the bowl with my soup. Mmmm!

**For those of you freaking out at my use of bacon fat to cook the potatoes, feel free to use olive oil, or any other oil of your liking. Me? I'm lazy, and the bacon fat is there. It's an easy choice for me. Enjoy!

Thursday, March 18, 2010

Happy (Late) St. Paddy's Day!


Before I get into the latest recipe for you all, please allow these two short digressions.

First, I've admittedly never been a big St. Patrick's Day person. Even when I was a kid, it never really excited me that much. As an adult of legal drinking age, I'm even less enamored with this holiday. Maybe it's because I've never been a big drinker, but I have trouble seeing the point in going out and getting shit-faced on green beer. I'm sure my Irish ancestors are rolling in their graves. Sorry, gingers, but I'm just not a fan. However, this year I did go out of my way to try and get into the spirit of things through, what else, food.

That being said, I feel the need to apologize for not posting this on the actual holiday. Lately, my job has been giving me even more reason to run and hide in my kitchen, and my university life has been taking up a lot of my time. Also, this being a rare personal diatribe, times have been tough lately. At home, my rambunctious toddler cat, Bowie, has been running me ragged for the past few days. I've discovered scratches on my television, surely from her, cat shit on my couch, witnessed by me, and cat piss in the bed. My boyfriend has had it with her and I can tell he's starting to resent her. I, on the other hand, am terrified that we'll never be able to scare these habits out of her. I've never in my entire life given away a cat. In my family, we keep them until they die, for better and for worse. We've never given up on a cat and I don't want to start with Bowie. But I also know that I can't continue to have my apartment be destroyed, as she has a definite talent for. We'll be meeting with the vet next week to discuss our options for discontinuing these undesired behaviors.

I've also been doing battle with the company my engagement ring came from because now, many months after purchasing it, we've found that the quality is less than desirable and repairs are pointless because the ring comes back more screwed up than when we sent it off for repair each time. This additional stress has been bringing me down and keeping me from posting this recipe.

Well, I promised you all limited personal diatribes, but I felt it was necessary to let you all know what was going on so that I could apologize for slacking a bit. Hopefully, this newest recipe will make you all forgive me. Believe me, it's a doozy!

Drumroll, please...

Guinness Cupcakes with Cream Cheese Frosting! Ta-dah! Once again, I'm giving you the tweaked version of the recipe here with a link to the original recipe below. I didn't stray from the cupcake recipe at all; however, I advise you all to avoid the original frosting recipe because, as I learned the hard way, it's incorrect.

These cupcakes are the moistest, tastiest little morsels you'll ever eat. Not to mention, they're so light and refreshing. They don't weigh you down, which is odd considering one sip of Guinness usually makes me feel as though I've dined on a meal that would make Henry VIII a little queasy. The frosting, on the other hand... oh, that frosting. If I had only known! I followed the recipe to the letter, but by the time I had finished combining the recommended measurements, I had a frosting with a donut glaze consistency that would never in a thousand years be spreadable. I added more and more powdered sugar until my two pound bag lay empty on the counter top. Still, little improvement was made. In the end, my boyfriend and I used our "frosting" as a dipping sauce. Although I was disappointed, it was no less delicious. I've adjusted the measurements in the version here so that you all will not have this same problem.

May your cupcakes have a thick, perfect frosting and be drunken with Irish love... and beer!

Guinness Cupcakes with Cream Cheese Frosting

Cake Ingredients

1 stick butter, melted
3 large eggs
2 cups sugar
3/4 cup sour cream
1 bottle (12 ounces) Guinness stout beer
Pinch of salt
1 teaspoon baking soda
3/4 cup unsweetened cocoa powder
1 tablespoon vanilla
2 cups all-purpose flour

Tools

Bowl
Whisk
Spoon
12-muffin pan
Paper muffin cups (optional, not pictured)


Instructions

1. Preheat the oven to 350F.

2. Whisk together the butter, eggs, sugar, sour cream, and Guinness.


3. Add salt, baking soda, cocoa powder, and vanilla and whisk until well combined.


4. Add the flour in half cup increments until the entire two cups is added, making sure the flour is well combined each time.

5. Place the paper muffin cups in the muffin pan if using. Otherwise, spray the pan with cooking spray or butter and flour it. Fill each cup with 1/4 cup of batter or about 3/4 full.


6. Bake at 350F for 20 minutes or until a toothpick inserted in the center of a cupcake comes out clean. Let cool for 10 minutes and remove from the muffin pan.

7. Continue in batches until there is no batter remaining.


Cream Cheese Frosting Ingredients

8 ounces cream cheese, softened
1/4 cup fat free half and half
1-pound box powdered sugar


Tools

Mixer (or a Ninja, in my case)


Instructions

1. Pour the half and half into the mixer first, followed by the cream cheese. Combine at low speed until smooth.

2. Add the powdered sugar in 1/2 cup increments, combining until smooth after each addition.

3. Once the cupcakes are cooled, top each one with frosting and enjoy!


Chocolate Stout Cupcakes from the Food Network Website

Sunday, March 14, 2010

Happy Pi Day!!!


It's Pi Day, everyone!

In honor of the mathematical constant π, I celebrated by making two pies today! But I'm not here to make apple pie, cherry pie, or a peach pocket pie. Forget that mediocrity! If I'm going to do Pi Day right for you guys, I've got to step it up!

When browsing around the Food Network website (one of my faves, of course) for the perfect pie recipe to make in honor of this special (read: food-oriented) day, I stumbled upon the pinnacle of WTF food concoctions: Avocado Pie.

AVOCADO WHA!? But if you think about it, it kind of makes sense. Avocados are very high in fat--monosaturated, to be precise-- and have a very mild flavor. That would ultimately make them a blank canvas, so to speak. The culinary tabula rasa. How intriguing.


Despite my logic, I was somewhat trepidatious. I had visions of my boyfriend taking one bite of the tea green-colored, creamy deception and looking at me painfully before promptly spitting it out. Actually, he would never do that. In the duration of our relationship, I've made some hits and I've made some misses, but I never made anything that he's just outright hated... that is, until the night I decided to try my hand at Eggplant Parmigiana. Oh, bless him. He took his first bite, grabbed his drink, and sat back in his chair, sipping slowly. Moments later, he sat forward and took another bite. I quietly watched, unready to jump to conclusions. Maybe his first bite was too hot. Maybe he was just thirsty-- he does drink like a camel most of the time. However, lo and behold, he immediately grabbed his drink again and started sipping. Our eyes met as he set his drink down on the table. I could see the caution in his eyes as he softly asked, "Baby, would you mind if I didn't eat the rest of this?" We now avoid eggplant-related dishes. He handled it gracefully, though. Like a champ.


I still had the problem of what I'd do if the Avocado Pie turned out to be a bust, and the chances of that happening were pretty high. I mean, there is no rating for the Avocado Pie recipe on the Food Network website. I was going into this blindly. However, I decided I would also go into this bravely, like an epicurean soldier. But a smart soldier. A soldier with a backup plan. And this backup plan was called Chocolate Cream Pie.

The recipe for Avocado Pie is a fairly easy one. Although the original recipe recommends using a mixer to blend the ingredients, I used my Ninja, a cross between a blender and a food processor. I dumped all of the ingredients in, watched as they whirred together into soft green unity, and poured them into the pie crust. After a few hours in the fridge, we were ready to put our experiment to the test. I served myself and my boyfriend each a slice, dolloped the whipped cream on, and went for it. I brought my boyfriend, who was on his computer at the time, his piece, and then I sat down in the other room with my own.

I took the first bite and let it play around my tongue, trying to detect the flavors. The citrus in the recipe hits the palate the hardest, followed by the sweet creaminess from the condensed milk and cream cheese. Overall, the pie tastes like a toned down version of Key Lime Pie. And while you can definitely detect the avocado, it doesn't stand on its own. Instead, it marries itself with the other flavors so that the entire dish is a symphony rather than a solo. I was halfway through my slice when my boyfriend walked into the room hurriedly, kissed me hard on the lips, looked into my eyes and said, "That pie is FANTASTIC!" He had already finished his piece and was apparently just as satisfied with my exercise in freaky foods as I was. The moral of the story, kids, is to try new things. You never know; you just may have an Avocado Pie on your hands.

But we're not finished yet. I still had a backup waiting in the fridge as well. My Chocolate Cream Pie, courtesy of Emeril Lagasse and the Food Network website. While this recipe is mostly straight forward, it did have one little curveball: there's buttermilk in the recipe in addition to cream. It makes for a pleasant tang in the finished dish that keeps it from being too rich or cloyingly sweet.

I made changes to both recipes to suit my own methods and findings. The recipes I am giving you all on here are my adaptations, although there are links to the originals at the bottom of each. Feel free to use whichever version suits your needs. Still, if there's one change I would force on you all if I could, it's the ready-made pie crusts. Each of these recipes call for cookie crusts, a graham cracker crust for the Avocado Pie and a chocolate cookie crust for the Chocolate Cream Pie. This is one shortcut I am more than willing to take, and I implore you all to as well. Whether you melt the butter and crush the cookies yourself or spend $2 and get the ready-made, a graham cracker is a graham cracker. So do yourself a favor and save 10 minutes.

Well, here you go, everybody. For your tasting pleasure. And for those of you who are still balking at Avocado Pie, I say to you, "Give it a try."

Avocado Pie

Ingredients

2 medium-sized hass avocados
8 ounces cream cheese, softened
1 14-ounce can sweetened condensed milk
2 1/2 tablespoons lime juice
1 1/2 tablespoons lemon juice
pinch of salt
1 ready-made graham cracker pie crust
sweetened whipped cream or Cool Whip for garnish


Tools

Food processor or mixer
Saran wrap


Instructions

1. Pour the lime and lemon juices into the food processor. Using the juices first will ensure that your ingredients will blend smoothly and the blades won't get stuck.

2. Add the cream cheese and pulse the food processor until it is smooth and creamy.

3. Cut the avocados in half and remove the pits. To remove, flick a knife into the seed, lodging it inside. Then twist and pull in one fluid motion.


4. Squeeze each of the halves until the avocado centers smush out. If you have properly ripened avocados, it should slide out easily. Watch for stems, which can detach from the skin sometimes. Pulse the food processor again until the avocado is smooth.

5. Add the sweetened condensed milk and salt. Pulse again until all of the ingredients come together.

6. Pour the mixture into the pie crust and smooth the top. Cover the top with saran wrap and refrigerate for at least four hours.


7. To serve, top with a dollop of whipped cream. Enjoy!


Chocolate Cream Pie

Ingredients

1 cup sugar
3/4 cup fat-free half and half
3/4 cup low-fat buttermilk
3 1/2 tablespoons cornstarch
pinch salt
4 egg yolks
1/2 cup semi-sweet chocolate chips
1 tablespoon butter
1 teaspoon vanilla extract
1 tub fat-free Cool Whip
1 ready-made chocolate pie crust


Tools
2 quart saucepan
bowl
whisk
spoon


Instructions

1. Combine the sugar, half and half, buttermilk, salt, and cornstarch in the saucepan and cook over medium heat until the mixture begins to bubble.

2. Meanwhile, in a separate bowl whisk the egg yolks until smooth and bright yellow.

3. Once the saucepan mixture is bubbling, SLOWLY whisk 1/2 cup of it into the egg yolks. This is called tempering. By warming up the egg yolks, you will ensure that they will not cook when you add them to the hot saucepan.

4. Add the yolks to the saucepan and whisk. Cook over medium heat until the mixture becomes thick.

5. Whisk in the chocolate chips and the butter. Remove from the saucepan from the heat and add the vanilla extract.


6. Transfer the mixture to a bowl and refrigerate for one hour.

7. After the mixture has cooled, fold in the Cool Whip and pour the mixture into the pie crust. Refrigerate for another hour.


8. To serve, top with a dollop of whipped cream. Enjoy!


Upcoming recipes include Mexican Wedding Cookies, Irish Soda Bread, Curry, Shrimp in Basil Cream Sauce, and more!


Avocado Pie on the Food Network website
Chocolate Cream Pie on the Food Network website